The Grid Enlarging Technique
Grid-enlarging is a simple technique used by great artists every day to create sensational works of art. The best part is that you don’t have to be skilled at drawing to achieve extraordinary results when using this method. Many of the world’s greatest oil painting artists don’t draw well at all, yet they use the grid-enlarging technique to start their paintings, which then become beautiful works of art.
Regardless of where you get your inspiration, be it from a photograph, drawing, or some other representation of an image you want to paint, grid enlarging can help the artist transfer a smaller image onto a larger canvas with precise detail, or as much detail as the artist desires.
What exactly is grid-enlarging?
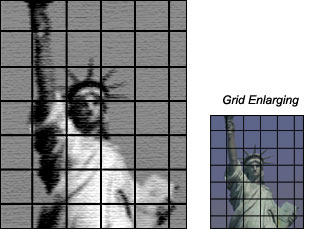 Grid enlarging is the process of using a grid to precisely copy and enlarge a smaller image and transfer it onto a larger canvas. Artists use this technique regularly to enlarge and transfer compositions they desire to paint to a canvas as part of preparing it for painting. This entails drawing a grid on your reference image and then drawing another grid on your canvas of equal or greater proportion. Then, one square at a time, you draw the picture onto your canvas, concentrating on the contents of each square until the image is complete.
Just about everyone knows what a grid is; however, if you don’t, a grid is a series of equally spaced horizontal and vertical lines that intersect to form a boxed pattern. It serves to divide the original image into smaller blocks to see what goes where more easily. Grid enlarging is a valuable exercise in helping to improve your drawing and observational skills.
5 Easy Steps to Grid Enlarging
Step 1: Select your reference photograph and use a viewfinder to isolate the section you want to paint. Next, you will need to determine the proportions of your composition. It is important that the image and the canvas be in the same proportion. For example, a composition that measures 4″ x 5″ is the same proportion as a 16″ x 20″ or 24″ x 30″ canvas. If your canvas is 12″ x 16″ or 18″ x 24″, then you will need to crop your reference photo to 3″ x 4″ or 6″ x 8″.
Smart tip: For detailed information about what a viewfinder is and how to use one, see the article titled "Making and Using a Viewfinder to Compose Better Paintings."
Step 2: The most important thing to keep in mind when drawing your grids is that they must be in a 1-to-1 ratio. It’s math 101. The size of your reference photo must always be equal in proportion to the size of the art canvas. If you fail to adhere to this principle, your drawing will be distorted. Also, the lines must be equally spaced vertically and horizontally, intersecting to create perfect squares.
Smart tip: After you have drawn your grids on both your reference photo and canvas, count the number of squares in each row and column on your canvas. It should be the same amount as the ones in your picture.
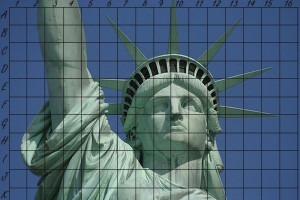 Step 3: Use a pencil and ruler to carefully measure and mark along the outside edge of the photo. Put tick marks at every inch, half-inch, or quarter inch, depending on the size of your reference image and how much detail you need to transfer. Then carefully connect your marks by lightly drawing your grid directly onto the image.
Be sure to draw the grid very lightly so you can easily erase it when you are finished. If you don’t want to draw on your photograph, you can tape a piece of clear acetate over your picture and then draw your grid on it using a very fine-point Sharpie marker.
Smart tip: Use a mechanical pencil to draw your grid. A mechanical pencil produces a very thin and precise line.
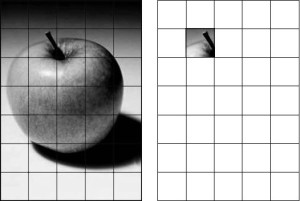 Step 4: Begin your transfer by drawing everything you see in one block of the reference photograph into the corresponding block on your canvas. Focus only on one square and ignore all the others until the one is completed, and it is time to copy the next block to canvas. The reason you should focus on only one block at a time is so that you will end up drawing what is actually there—what your eye sees—rather than what you think should be there.
Try as best you can to copy exactly all the details you see in that one little block on the photo to its corresponding block on your canvas. Be sure to include the shadows and highlights too. Continue this process one block at a time until all the blocks have been drawn onto your canvas. When you have finished that last block, you will have a very close rendering of your reference photo ready to paint.
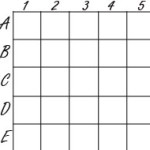 A good place to start drawing is with the top left square of your canvas. Then work your way across and down the canvas, row-by-row and column-by-column, until you have completed your detailed drawing. Pay careful attention to make sure you are in the correct square, or your drawing will be off, and you will have to erase some of the drawing and start over from the point where you went off-grid.
An excellent way to keep your blocks straight is by marking them numerically and alphabetically along the edges of the photo and canvas. In other words, the first block on your canvas that is located in the top left corner would be block A1, the next one to the right on the same row would be block A2, and so forth. This will help keep you from getting lost, especially within much larger paintings that have a lot of squares. Write the numbers and letters small and faint enough so that they can be easily erased.
Smart tip: Use a thin piece of sharpened charcoal instead of a pencil when transferring your drawing. The advantage of charcoal over pencil is that charcoal can be easily wiped off with your finger, kneaded eraser, paper towel, or rag, whereas pencil lead requires more effort to erase. Spray with a fixative to keep your charcoal drawing from rubbing off when you finish your drawing.
Step 5: When you have finished transferring the complete image to canvas, gently erase the grid lines and begin your oil painting.
A helpful online tool you can use to draw your grids is ArtTutor. Here is the link.
You May Also Like
FROM THE EDITORS: We hope you enjoyed this blog about grid enlarging and found it’s information to be useful. We’re sure you’ll enjoy the paintings below too. For more information and details, click or tap the thumbnail link.
20″ w x 16″ h

11″ w x 14″ h

(2022)
30″ w x 24″ h
Art Gallery Quick Links
Flowers | Landscapes | Marine | People
Space Art | Still Life | Wildlife
Additional Reading
Making and Using a Viewfinder to Compose Better Paintings
The Importance of Varnishing Oil Paintings
More information about this topic and many others can be found in My Artist Blog Index. Check it out!
Thanks for reading this!
Feel free to share this with your friends.
